Tuesday, November 18, 2008

64-bit Flash 10 on Fedora 10

Since Adobe has released 'alpha' version of their 64-bit version of the flash player, thought i'd give it a try in Fedora 10. It just works !

Installation process is simple. Uninstall your existing flash packages.


nareshv@ >] rpm -qa \*flash\*
nareshv@ >] sudo rpm -e `rpm -qa \*flash\*`


Get the Flash Plugin from here


[nareshv@ >]$ tar zxf libflashplayer-10.0.d20.7.linux-x86_64.so.tar.gz
[nareshv@ >]$ ls libflashplayer.so
libflashplayer.so
[nareshv@ >]$ cp libflashplayer.so ~/.mozilla/plugins/


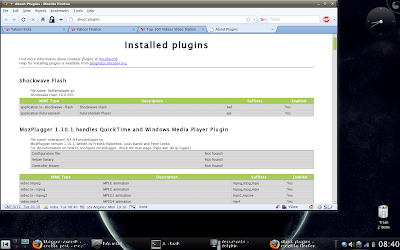
Thats it. Restart your browser, you should see the flash plugin present in firefox (check it by typing about:plugins in the address bar.)

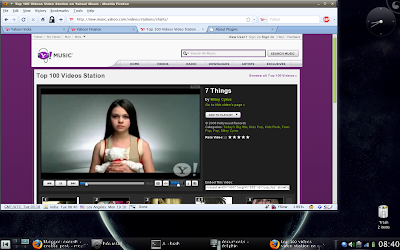
Attached are the two screenshots on my Fedora10 Macbook.

1. Yahoo! Music playing videos with the new 64-bit flash-player.


2. Firefox 'about:plugins' window showing the new 64-bit Flash Player

Thursday, November 13, 2008

Fedora 10 Final on Macbook Pro

I've been using Fedora-10 Since its Beta on my Macbook Pro. As always the F-10 Is available to the rawhide users, before its available to the outside world.


[nareshv@nareshv ~]$ uname -r
2.6.27.5-94.fc10.x86_64
[nareshv@nareshv ~]$ cat /etc/issue
Fedora release 10 (Cambridge)
Kernel \r on an \m (\l)
[nareshv@nareshv ~]$ date
Thu Nov 13 21:28:13 IST 2008


All other users need to wait for the Final ISOs to come out. So far experience with Fedora 10 is really fantastic compared with the previous releases.

AFAIK, all the devices are working out of the box. Even i can Hibernate My Notebook With Fedora 10, Atleast KDE4 is doing that when my battery runs out (which was not possible in earlier releases).

Here is the Link to the Installation on Macbook

Notes: NetworkManager now connects to the wireless networks flawlessly. Previously i had to try connecting few times to the wireless networks (atleast with the airtel wifi modem in india)

Sunday, October 05, 2008

Fedora 10-Beta 64-bit on Macbook Pro 4,1


Am using Fedora 10 Final release now(Nov-13-2008) (from rawhide) see this post
Blog Last Updated: Sunday Nov 16 2008 IST Quirk for the touchpad is updated

Fedora 10 Version: Applied all updates from rawhide as of Sunday Nov 2 2008 IST

Installation Process


Partitioning and Installation process is as described in my previous post

Post Installation Process


1. Wireless


You no longer need to install the ndiswrapper manually. Configure the 'livna' repository and install the ndiswrapper.


bash$ sudo yum install ndiswrapper


Download the drivers from here, and add them to the ndiswrapper


bash$ cd /tmp/drivers
bash$ sudo ndiswrapper -i *.inf
bash$ sudo ndiswrapper -m
bash$ sudo ndiswrapper -mi
bash$ sudo ndiswrapper -ml


2. Touchpad/Tapping


Fedora 10 Automatically configures the touchpad driver using the bcm5974 driver present in the 2.6.27 kernel.

But, not all the tapping/right-click,scrolling features are available. You need to create the /etc/X11/xorg.conf (yea, with Fedora 10 there is no xorg.conf!), with the following options.

(If you are on 64-bit Fedora use /usr/lib64 in the xorg.conf)


Section "ServerLayout"
Identifier "Default Layout"
Screen 0 "Screen0" 0 0
InputDevice "Keyboard0" "CoreKeyboard"
InputDevice "Synaptics Touchpad" "CorePointer"
EndSection

Section "Files"
ModulePath "/usr/lib/xorg/modules/extensions/nvidia"
ModulePath "/usr/lib/xorg/modules"
EndSection

Section "Module"
Load "synaptics"
Load "extmod"
Load "dbe"
Load "glx"
EndSection

Section "InputDevice"
Identifier "Synaptics Touchpad"
Driver "synaptics"
Option "SendCoreEvents" "true"
Option "Device" "/dev/input/mice"
Option "Protocol" "auto-dev"
Option "SHMConfig" "true"
Option "LeftEdge" "10"
Option "RightEdge" "1200"
Option "TopEdge" "10"
Option "BottomEdge" "370"
Option "FingerLow" "10"
Option "FingerHigh" "20"
Option "MaxTapTime" "180"
Option "MaxTapMove" "220"
Option "SingleTapTimeout" "100"
Option "MaxDoubleTapTime" "180"
Option "LockedDrags" "off"
Option "MinSpeed" "1.10"
Option "MaxSpeed" "1.30"
Option "AccelFactor" "0.08"
Option "TapButton1" "1"
Option "TapButton2" "3"
Option "TapButton3" "2"
Option "RTCornerButton" "0"
Option "RBCornerButton" "0"
Option "LTCornerButton" "0"
Option "LBCornerButton" "0"
Option "VertScrollDelta" "20"
Option "HorizScrollDelta" "50"
Option "HorizEdgeScroll" "0"
Option "VertEdgeScroll" "0"
Option "VertTwoFingerScroll" "1"
Option "HorizTwoFingerScroll" "1"
EndSection


Section "InputDevice"

# keyboard added by rhpxl
Identifier "Keyboard0"
Driver "kbd"
Option "XkbModel" "pc105"
Option "XkbLayout" "us"
EndSection

Section "Monitor"
Identifier "Monitor0"
VendorName "Unknown"
ModelName "Unknown"
HorizSync 30.0 - 110.0
VertRefresh 50.0 - 150.0
Option "DPMS"
EndSection

Section "Device"
Identifier "Videocard0"
Driver "nvidia"
EndSection

Section "Screen"
Identifier "Screen0"
Device "Videocard0"
Monitor "Monitor0"
DefaultDepth 24

Option "AllowGLXWithComposite" "True"
Option "AddARGBGLXVisuals" "True"
Option "TripleBuffer" "True"
Option "UseDamageEvents" "True"
Option "UseRandR" "True"
Option "RenderAccel" "True"
Option "NoPowerConnectorCheck" "False"
Option "RandRRotation" "True"
Option "DynamicTwinView" "True"
Option "OnDemandVBlankInterrupts" "True"
Option "ConnectToAcpid" "True"
Option "EnableACPIHotkeys" "True"
Option "UseEvents" "True"
Option "ExactModeTimingsDVI" "True"
Option "NvAGP" "0"

SubSection "Display"
Viewport 0 0
Depth 24
EndSubSection
EndSection


Section "Extensions"
Option "Composite" "Enable"
EndSection


3. Audio


Somehow the audio doesn't work out of the box, you need to set the model option


bash$ echo "options snd_hda_intel model=mbp3" >> /etc/modprobe.d/sound


4. Bluetooth


Works out of the box

5. Firewire


Haven't tested (Don't have a device to check)

6. Microphone


Haven't tested

7. Suspend/Hibernate (Latest quirk updated on 16-Nov-2008)


Touchpad doesn't work after resume. Here is the quirk for that


1. create the following file

(If you are running 32-bit Fedora 10 use /usr/lib instead of /usr/lib64)

[nareshv@nareshv ~]$ ls -l /usr/lib64/pm-utils/sleep.d/
total 80
-rwxr-xr-x 1 root root 2425 2008-11-04 18:03 00auto-quirk
-rwxr-xr-x 1 root root 274 2008-11-04 18:03 00logging
-rwxr-xr-x 1 root root 203 2008-11-04 18:03 00powersave
-rwxr-xr-x 1 root root 809 2008-11-04 18:03 01grub
-rwxr-xr-x 1 root root 341 2008-11-15 18:52 02touchpad
-rwxr-xr-x 1 root root 664 2008-11-04 18:03 49bluetooth
-rwxr-xr-x 1 root root 447 2008-11-04 18:03 50ntpd
-rwxr-xr-x 1 root root 429 2008-11-04 18:03 55battery
-rwxr-xr-x 1 root root 1029 2008-11-04 18:03 55NetworkManager
-rwxr-xr-x 1 root root 409 2008-11-04 18:03 65alsa
-rwxr-xr-x 1 root root 335 2008-11-04 18:03 75modules
-rwxr-xr-x 1 root root 391 2008-11-04 18:03 90chvt
-rwxr-xr-x 1 root root 419 2008-11-04 18:03 90clock
-rwxr-xr-x 1 root root 1098 2008-11-04 18:03 94cpufreq
-rwxr-xr-x 1 root root 297 2008-11-04 18:03 95led
-rwxr-xr-x 1 root root 707 2008-11-05 15:31 95packagekit
-rwxr-xr-x 1 root root 2920 2008-11-04 18:03 98smart-kernel-video
-rwxr-xr-x 1 root root 2068 2008-11-04 18:03 99hd-apm-restore.hook
-rwxr-xr-x 1 root root 5492 2008-11-04 18:03 99video

[nareshv@nareshv ~]$ cat /usr/lib64/pm-utils/sleep.d/02touchpad
#!/bin/bash

if [ -e '/usr/lib64/pm-utils/functions' ];then
. /usr/lib64/pm-utils/functions
fi

suspend_bcm5974() { /sbin/rmmod bcm5974; }
resume_bcm5974() { /sbin/modprobe bcm5974; }

case "$1" in
suspend|hibernate)
suspend_bcm5974;
;;
thaw|resume)
resume_bcm5974;
;;
*)
;;
esac

exit $?

2. Now suspend/resume should work without any problems.


NOTE: Earlier, i was adding the script to /etc/pm/sleep.d directory, which seem to have the problem i mentioned in this bug, if you follow the above quirk, all your sensitivity/tapping things as mentioned in the xorg.conf should work as expected after the resume/hibernate.

8. Hibernate


Works out of the box.

(I am using KDE as my default desktop, sometimes i leave my notebook on battery and go out, KDE automatically takes care of hibernating the laptop when battery power reaches critical state. Resuming from hibernate works cool too!). My kernel version is 2.6.27.4-58.fc10.x86_64

9. Network Card


Works out of the box

10. Nvidia Graphics card


Works out of the box.

In order to make use of the compiz-fusion you need to install the latest 177.78 driver from livna repository.

11. Keyboard special keys / Backlight


Install pommed from this location. After installation edit the /etc/pommed.conf


[nareshv@fallenAngel ]$ cd /etc/yum.repos.d

[nareshv@fallenAngel ]$ wget http://www.diffingo.com/downloads/diffingo-repo/diffingo.repo

[nareshv@fallenAngel ]$ sudo yum install pommed


NOTES: Keyboard backlit and sensors support in Fedora 10 is available from 2.6.27.3-34.rc1.fc10 or higher kernel, as the correct patches were applied to applesmc driver

12. isight (webcam)


Works out of the box.

13. Plymouth Graphical Plugins


By default you wont be able to see the latest plymouth graphical plugin on your macbook after the installation. Here is the quirk for that ( add vga=0x318 option to your /etc/grub.conf)

If you want to see the power of plymouth in action . see the videos
Here is mine.


# grub.conf generated by anaconda
#
# Note that you do not have to rerun grub after making changes to this file
# NOTICE: You have a /boot partition. This means that
# all kernel and initrd paths are relative to /boot/, eg.
# root (hd0,2)
# kernel /vmlinuz-version ro root=/dev/sda6
# initrd /initrd-version.img
#boot=/dev/sda3
default=0
timeout=5
splashimage=(hd0,2)/grub/splash.xpm.gz
hiddenmenu
title Fedora (2.6.27.5-109.fc10.x86_64)
root (hd0,2)
kernel /vmlinuz-2.6.27.5-109.fc10.x86_64 ro root=UUID=9972fac9-aba9-443e-a6a1-de3e0a0e8147 vga=0x318 rhgb quiet
initrd /initrd-2.6.27.5-109.fc10.x86_64.img
title Fedora (2.6.27.5-94.fc10.x86_64)
root (hd0,2)
kernel /vmlinuz-2.6.27.5-94.fc10.x86_64 ro root=UUID=9972fac9-aba9-443e-a6a1-de3e0a0e8147 vga=0x318 rhgb quiet
initrd /initrd-2.6.27.5-94.fc10.x86_64.img
title Fedora (2.6.27-3.applesmc.fc10.x86_64)
root (hd0,2)
kernel /vmlinuz-2.6.27-3.applesmc.fc10.x86_64 ro root=UUID=9972fac9-aba9-443e-a6a1-de3e0a0e8147 vga=0x318 rhgb quiet
initrd /initrd-2.6.27-3.applesmc.fc10.x86_64.img
title Other
rootnoverify (hd1,0)
chainloader +1


After adding the vga= option to your grub.conf there is a default plugin which will be used. If you want to use the Fedora's solar plugin. run these commands and reboot Fedora 10 to see the plugin in action.


[nareshv@nareshv ~]$ sudo plymouth-set-default-plugin solar
[nareshv@nareshv ~]$ sudo /usr/libexec/plymouth/plymouth-update-initrd

References


Below documentations are verymuch useful in case of any problems.

[1] Fedora : http://www.mactel-linux.org/wiki/Fedora8OnMacBookSantaRosa
[2] Ubuntu : https://help.ubuntu.com/community/Macbook_Air
[3] Wifi Drivers : ftp://ftp.hp.com/pub/softpaq/sp37501-38000/sp37950.exe
Wednesday, September 24, 2008

Fedora 9 on MacBook Pro penryn (Intel)

Pre Installation Process


  1. Macbook has a single harddisk with two partitions, first one is for the EFI, second one is for the MacOSX itself. Resize the second partition to allow some space for Linux.

  2. After step-1 you have 3 partitions on your system. Do not touch the first and second partitions, you might loose your whole data on MacOSX

  3. Install rEFIt from here http://refit.sourceforge.net/. rEFIt scans all the available partitions/harddisks/removable devices for the Boot Images. After we install rEFIt we don't have to do any special configurations etc, it will auto-detect things for us.


  4. Installation Process


    1. Insert your Fedora 9 DVD into the notebook and reboot your Mac.

    2. rEFIt asks you to choose the 'bootable DVD' or 'MacOSX' for booting. Select the 'Tux' icon with arrow keys, now you can boot into the Fedora 9 Install system

    3. Answer all the questions as usual during the install process. Be careful at the partitioning page. Choose 'create custom layout'.

      1. Select the Last partition(/dev/sda3) that we've created on disk (extreme right block on the gui). Click on 'Delete' partition (Double check that you are deleting the right partition)

      2. Now you'll have free space on your system

      3. Lets create 3 partitions from the free space.

      4. Create new partition for /boot with 200MB of space (/dev/sda3)

      5. Create new partition for swap with 2GB of space

      6. Create new partition for / with the rest of available space (/dev/sda4)


    4. After you are done with the changes click 'apply' (This step writes the requested changes to disk, double check before applying your changes)

    5. Customize your packages and proceed with the rest of the installation


    Post Installation Process


    Login to your account and perform all the package updates. (This will make sure you have all the latest packages)

    1. Wireless Setup


    Wireless doesn't work automatically due to the Broadcom wireless chipset present in the system. Do not worry, its easy to get the wireless working.

    Download the windows driver package from here . (If you have 'wine' packages installed on system its easy to extract all the driver related from files within your linux itself, if not go to a windows machine extract the drivers which are present in the .exe file and copy them over to linux).

    Extract the drivers from the .exe into /tmp/ndis (I am using /tmp/ndis for all the steps below)

    Open Terminal and go to that directory


    [nareshv@fallenAngel ]$ cd /tmp/ndis
    [nareshv@fallenAngel ]$ pwd
    /tmp/ndis/sp37950a
    [nareshv@fallenAngel ]$ ls
    bcm43xx64.cat bcm43xx.cat bcmwl564.sys bcmwl5.inf bcmwl5.sys bcmwlcoi64.dll bcmwlcoi.dll Setup.exe sp37950.cva


    Download the ndiswrapper from Subversion (currently the ndiswrapper-1.53 doesn't compile correctly on 2.6.26 and higher kernels)


    [nareshv@fallenAngel ]$ mkdir /tmp/ndiswrapper/
    [nareshv@fallenAngel ]$ cd /tmp/ndiswrapper/
    [nareshv@fallenAngel ]$ svn co https://ndiswrapper.svn.sourceforge.net/svnroot/ndiswrapper ndiswrapper
    [nareshv@fallenAngel ]$ pwd
    /tmp/ndiswrapper
    [nareshv@fallenAngel ]$ ls
    branches trunk
    [nareshv@fallenAngel ]$ cd trunk/
    [nareshv@fallenAngel ]$ ls
    CVSROOT ndiswrapper
    [nareshv@fallenAngel ]$ cd ndiswrapper/
    [nareshv@fallenAngel ]$ ls
    AUTHORS ChangeLog driver INSTALL loadndisdriver.8 Makefile ndiswrapper.8 ndiswrapper.spec README utils


    (Before compiling stuff, make sure you have the kernel-2.6.26 and kernel-devel-2.6.26 packages)


    [nareshv@fallenAngel ]$ make

    [nareshv@fallenAngel ]$ sudo make install


    Now you have installed the ndiswrapper scripts and kernel module into the system.


    Install the drivers for wireless now


    [nareshv@fallenAngel ]$ cd /tmp/ndis/sp37950a/
    [nareshv@fallenAngel ]$ sudo ndiswrapper -i bcmwl5.inf


    Verify that the drivers are installed. You should see something like below.


    [nareshv@fallenAngel ~]$ sudo /usr/sbin/ndiswrapper -l
    bcmwl5 : driver installed
    device (14E4:4328) present (alternate driver: ssb)


    Setup the kernel modules to be autoloaded.


    [nareshv@fallenAngel ~]$ sudo /usr/sbin/ndiswrapper -ma
    module configuration information is stored in /etc/modprobe.d/ndiswrapper
    [nareshv@fallenAngel ~]$ sudo /usr/sbin/ndiswrapper -mi
    module configuration information is stored in /etc/modprobe.d/ndiswrapper
    [nareshv@fallenAngel ~]$ sudo /usr/sbin/ndiswrapper -m
    [nareshv@fallenAngel ~]$ cat /etc/modprobe.conf
    alias wlan0 ndiswrapper


    Load the kernel module


    [nareshv@fallenAngel ]$ sudo /sbin/modprobe ndiswrapper


    Check the wlan0 device


    [nareshv@fallenAngel ]$ /sbin/iwconfig wlan0


    Now the NetworkManager should detect your wifi device and shows the list of available devices. Select your network and enter the passcode (if any).

    Bluetooth


    Just works


    Audio


    Just works. Run this command.


    [nareshv@fallenAngel ]$ echo "options snd_hda_intel model=mbp3" >> /etc/modprobe.d/sound


    Make sure to add yourself to the 'pulse-rt,pulse,pulse-access' groups from 'system-config-users' command.

    Ethernet card


    Just works

    Nvidia Graphics


    Install the nvidia drivers from either freshrpms (http://freshrpms.net) or Livna repositories

    Keyboard special keys / Backlight


    Install the pommed rpm from the following location.


    [nareshv@fallenAngel ]$ cd /etc/yum.repos.d

    [nareshv@fallenAngel ]$ wget http://www.diffingo.com/downloads/diffingo-repo/diffingo.repo

    [nareshv@fallenAngel ]$ sudo yum install pommed


    (Edit the /etc/pommed.conf to suit your needs)

    Touchpad/Tapping


    This currently works out of the box (all the tapping features) on 2.6.27 and higher kernels. For this you can just upgrade your kernel from the 'fedora-rawhide' repository.

    I've filed a ticket with Redhat Bugzilla to get this driver for 2.6.26 and lower kernels, but the
    the touchpad is gonna work only from Fedora 10, See this ticket for reference

    In case someone interested in trying out the bcm5974 driver for the 2.6.26 and lower kernels, i have created a dkms package for RPM based systems. Give it a try, let me know if things work for you.


    Add the following lines to your xorg.conf so that synaptics driver can help
    your touchpad work like that in the macosx. Here is mine looks like.


    # nvidia-xconfig: X configuration file generated by nvidia-xconfig
    # nvidia-xconfig: version 1.0 (buildmeister@builder63) Wed Aug 27 13:20:19
    # PDT 2008

    # Xorg configuration created by pyxf86config

    Section "ServerLayout"
    Identifier "Default Layout"
    Screen 0 "Screen0" 0 0
    InputDevice "Keyboard0" "CoreKeyboard"
    InputDevice "Synaptics Touchpad" "CorePointer"
    EndSection

    Section "Files"
    ModulePath "/usr/lib/xorg/modules/extensions/nvidia"
    ModulePath "/usr/lib/xorg/modules"
    EndSection

    Section "Module"
    Load "synaptics"
    Load "extmod"
    Load "dbe"
    Load "glx"
    EndSection

    Section "InputDevice"
    Identifier "Synaptics Touchpad"
    Driver "synaptics"
    Option "SendCoreEvents" "true"
    Option "Device" "/dev/input/mice"
    Option "Protocol" "auto-dev"
    Option "SHMConfig" "true"
    Option "LeftEdge" "10"
    Option "RightEdge" "1200"
    Option "TopEdge" "10"
    Option "BottomEdge" "370"
    Option "FingerLow" "10"
    Option "FingerHigh" "20"
    Option "MaxTapTime" "180"
    Option "MaxTapMove" "220"
    Option "SingleTapTimeout" "100"
    Option "MaxDoubleTapTime" "180"
    Option "LockedDrags" "off"
    Option "MinSpeed" "1.10"
    Option "MaxSpeed" "1.30"
    Option "AccelFactor" "0.08"
    Option "TapButton1" "1"
    Option "TapButton2" "3"
    Option "TapButton3" "2"
    Option "RTCornerButton" "0"
    Option "RBCornerButton" "0"
    Option "LTCornerButton" "0"
    Option "LBCornerButton" "0"
    Option "VertScrollDelta" "20"
    Option "HorizScrollDelta" "50"
    Option "HorizEdgeScroll" "0"
    Option "VertEdgeScroll" "0"
    Option "VertTwoFingerScroll" "1"
    Option "HorizTwoFingerScroll" "1"
    EndSection


    Section "InputDevice"

    # keyboard added by rhpxl
    Identifier "Keyboard0"
    Driver "kbd"
    Option "XkbModel" "pc105"
    Option "XkbLayout" "us"
    EndSection

    Section "Monitor"
    Identifier "Monitor0"
    VendorName "Unknown"
    ModelName "Unknown"
    HorizSync 30.0 - 110.0
    VertRefresh 50.0 - 150.0
    Option "DPMS"
    EndSection

    Section "Device"
    Identifier "Videocard0"
    Driver "nvidia"
    EndSection

    Section "Screen"
    Identifier "Screen0"
    Device "Videocard0"
    Monitor "Monitor0"
    DefaultDepth 24

    Option "AllowGLXWithComposite" "True"
    Option "AddARGBGLXVisuals" "True"
    Option "TripleBuffer" "True"
    Option "UseDamageEvents" "True"
    Option "UseRandR" "True"
    Option "RenderAccel" "True"
    Option "NoPowerConnectorCheck" "False"
    Option "RandRRotation" "True"
    Option "DynamicTwinView" "True"
    Option "OnDemandVBlankInterrupts" "True"
    Option "ConnectToAcpid" "True"
    Option "EnableACPIHotkeys" "True"
    Option "UseEvents" "True"
    Option "ExactModeTimingsDVI" "True"
    Option "NvAGP" "0"

    SubSection "Display"
    Viewport 0 0
    Depth 24
    EndSubSection
    EndSection


    Section "Extensions"
    Option "Composite" "Enable"
    EndSection


    Now upgrade your kernel to 2.6.27 as it allows all the above changes in xorg.conf come true.


    sudo yum --enable-repo=fedora-rawhide update kernel kernel-devel


    After kernel upgrade reboot your box and then recompile the ndiswrapper too (its easy, no other changes required)


    cd /tmp/ndiswrapper/trunk/ndiswrapper && make uninstall && make && make install && modprobe ndiswrapper


    Remove the 'applesmc' driver , its causing some problems with the wireless in 2.6.27. Also you see the following wierd error lines in /var/log/messages. Not sure if they are harmless. But removing the applesmc make them go away.


    echo "applesmc" >> /etc/modporbe.d/blacklist

    rmmod applesmc


    Suspend


    Just works

    Hibernate


    Fails sometimes.

    Microphone


    Haven't tested

    iSight (webcam)


    Just works.

    Install this package


    bash$ sudo yum install isight-firmware-tools


    Test the camera using 'cheese' or 'tvtime'


    bash$ sudo yum install cheese


    References


    Below documentations are verymuch useful in case of any problems.

    [1] Fedora : http://www.mactel-linux.org/wiki/Fedora8OnMacBookSantaRosa
    [2] Ubuntu : https://help.ubuntu.com/community/Macbook_Air
    [3] Wifi Drivers : ftp://ftp.hp.com/pub/softpaq/sp37501-38000/sp37950.exe

Tuesday, September 23, 2008

Fedora 9 and Thunderbird / Lightning problem

Here goes the problem description,

You've installed Fedora without any development stuff on your notebook/workstation, Using thunderbird as the official mail client, using lightning as your default calendar handler.

If you are in the above case, you might face this wierd problem. Lightning extension does not show you the timezones, doesn't recognize the .ics invites which are present in the email. Here is why

Look at the following image for a description of what happens.


The problem could be that, you don't have the libstdc++.so.5 installed on your box. The lightning project also says the same. But the lightning extension fails to detect the presence of the shared library. This html tidy extension does good job of identifying the missing shared library.

In order to fix the problem with lightning, install the compat-libstdc++-3 package


bash$ sudo yum install libstdc++.so.5


Now, relaunch your thunderbird, lightning will work fine. It took quite sometime for me to figure out whats the real problem is.

Hope this trick will help you guys out.

Thursday, May 29, 2008

Fedora 9 and Nvidia xorg 1.5 compatible driver (nvidia 174.14.05 version)

Nvidia has just released its latest xorg-1.5 supported driver. All the Fedora 9 Owners who are eagerly waiting for the latest nvidia driver rejoice !.

Installation of this is pretty easy, just follow these steps.

1. Add Freshrpms to your repository


sudo rpm -Uvh http://ftp.freshrpms.net/pub/freshrpms/fedora/linux/9/freshrpms-release/freshrpms-release-1.1-1.fc.noarch.rpm


2. Install the nvidia driver


sudo yum install nvidia-x11-drv


3. Logout of X and go to runlevel 1 or 3


sudo init 1


4. Update your /etc/X11/xorg.conf to make use of new nvidia driver. (mine is follows)


[nareshv@fallenAngel ~]$ cat /etc/X11/xorg.conf

# nvidia-xconfig: X configuration file generated by nvidia-xconfig
# nvidia-xconfig: version 1.0 (buildmeister@builder3) Wed Jun 13 18:39:30 PDT 2007
# Xorg configuration created by system-config-display

Section "ServerLayout"
Identifier "single head configuration"
Screen 0 "Screen0" 0 0
InputDevice "Keyboard0" "CoreKeyboard"
InputDevice "Synaptics" "CorePointer"
EndSection

Section "Files"
ModulePath "/usr/lib/xorg/modules/extensions/nvidia"
ModulePath "/usr/lib/xorg/modules"
EndSection

Section "Module"
Load "glx"
Load "extmod"
Load "dbe"
EndSection

Section "InputDevice"
Identifier "Keyboard0"
Driver "kbd"
Option "XkbModel" "pc105"
Option "XkbLayout" "us"
EndSection

Section "InputDevice"
Identifier "Synaptics"
Driver "synaptics"
Option "Device" "/dev/input/mice"
Option "Protocol" "auto-dev"
Option "Emulate3Buttons" "yes"
EndSection

Section "Monitor"
Identifier "Monitor0"
VendorName "HP"
ModelName "Unknown"
ModeLine "1280x800_60.00" 83.5 1280 1344 1480 1680 800 801 804 828 -hsync +vsync
Option "DPMS"
#[nareshv@fallenangel ~]$ gtf 1280 800 60
# 1280x800 @ 60.00 Hz (GTF) hsync: 49.68 kHz; pclk: 83.46 MHz
EndSection

Section "Device"
Identifier "Videocard0"
Driver "nvidia"
VendorName "NVIDIA Corporation"
BoardName "GeForce Go 7400"
VideoRam 268435456
EndSection

Section "Screen"
Identifier "Screen0"
Device "Videocard0"
Monitor "Monitor0"
DefaultDepth 24
Option "AllowGLXWithComposite" "True"
Option "AddARGBGLXVisuals" "True"
Option "TripleBuffer" "True"
Option "UseDamageEvents" "True"
Option "UseRandR" "True"
#Option "RenderAccel" "True"
Option "NoPowerConnectorCheck" "False"
Option "RandRRotation" "True"
Option "DynamicTwinView" "False"
Option "OnDemandVBlankInterrupts" "True"
Option "ConnectToAcpid" "True"
Option "EnableACPIHotkeys" "True"
Option "UseEvents" "True"
Option "ExactModeTimingsDVI" "True"
Option "NvAGP" "0"
SubSection "Display"
Viewport 0 0
Depth 24
Modes "1280x800" "1024x768" "800x600" "640x480"
EndSubSection
EndSection

Section "Extensions"
Option "Composite" "Enable"
EndSection


5. Now follow step-6, only if you have renamed the /usr/bin/Xorg as per my previous blog post

6. Remove the Shell Script


# mv /usr/bin/Xorg.0 /usr/bin/Xorg


7. Load the nvidia kernel module


# modprobe nvidia


8. Go to Run level 5 (GUI)


# init 5


Now you should have the system using the Latest nvidia driver as the default, with all the compiz,3d, everything working!

Here is my screenshot of running glxgears with 1600fps


Now you can start enjoying KDE4 with all the 3d effects !. Many thanks to nvidia for the much awaited compatibility with xorg-1.5

Thursday, May 15, 2008

Fedora 9 and Nouveau Nvidia Driver

Given that the current nvidia driver does not support all the fancy features which are required to run a fully productive desktop, i've tried to see the current state of the nouveau

Fedora 9 currently does not ship the 'nouvea_dri.so' with its mesa rpms. In order to get the feel of the dri using nouveau, i've compiled the mesa drivers from sources.


Instructions follows

NOTE: Do not report any issues to Fedora Bugzilla or Nouveau Bugzilla when using the Gallium Drivers. These are completely experimental.

NOTE: Since the gallium 3d does not support all the Visuals (ARGBGLX) required to run compiz, compiz does not work.

0. Below are my Hardware Details

Smolt profile :: http://www.smolts.org/client/show/pub_af62c229-68e1-4b66-9171-b8be36c7a3fd


[nareshv@fallenAngel mesa]$ /sbin/lspci | grep -i nvidia
01:00.0 VGA compatible controller: nVidia Corporation G72M [GeForce Go 7400] (rev a1)


1. Get the mesa sources (50M sources) using git


cd /tmp
git clone git://anongit.freedesktop.org/git/nouveau/mesa


2. Switch to the gallium-0.1 branch


cd mesa/
git checkout origin/gallium-0.1
git checkout -b gallium-0.1


3. Configure the Library installation paths. (open and edit the file so that below 2 settings should be like this)


[nareshv@fallenAngel configs]$ pwd
/tmp/mesa/configs
[nareshv@fallenAngel configs]$ grep INSTALL_DIR default | grep -v SEARCH
INSTALL_DIR = /usr/
DRI_DRIVER_INSTALL_DIR = /usr/lib/dri/


4. Make sure you have all the Xorg development libraries installed.


[root@fallenAngel ~]# rpm -qa lib\*-devel
libacl-devel-2.2.47-1.fc9.i386
libXfixes-devel-4.0.3-3.fc9.i386
libSM-devel-1.0.2-5.fc9.i386
libattr-devel-2.4.41-1.fc9.i386
libogg-devel-1.1.3-9.fc9.i386
libuser-devel-0.56.9-1.i386
libXau-devel-1.0.3-5.fc9.i386
libXmu-devel-1.0.4-1.fc9.i386
libcap-devel-2.06-4.fc9.i386
libxml2-devel-2.6.32-1.fc9.i386
libxcb-devel-1.1-4.fc9.i386
libX11-devel-1.1.4-1.fc9.i386
libdrm-devel-2.4.0-0.11.fc9.i386
libXt-devel-1.0.4-5.fc9.i386
libsepol-devel-2.0.26-1.fc9.i386
libgdiplus-devel-1.9-4.fc9.i386
libcurl-devel-7.18.1-1.fc9.i386
libXdmcp-devel-1.0.2-5.fc9.i386
libXdamage-devel-1.1.1-4.fc9.i386
libXxf86vm-devel-1.0.1-5.fc9.i386
libselinux-devel-2.0.61-1.fc9.i386
libXext-devel-1.0.4-1.fc9.i386
libXi-devel-1.1.3-4.fc9.i386
libstdc++-devel-4.3.0-8.i386
libidn-devel-0.6.14-7.i386
libvorbis-devel-1.2.0-3.fc9.i386
libICE-devel-1.0.4-3.fc9.i386


5. Start building mesa for your OS (i386 or x86_64)


[nareshv@fallenAngel mesa]$ ls
bin configs doxygen Makefile SConstruct winddk.py
common.py docs include progs src
[nareshv@fallenAngel mesa]$ make DRI_DIRS=nouveau linux-dri-x86

(replace linux-dri-x86 with linux-dri-x86_64 if you are on 64bit Fedora)


8. Try running glxgears with the latest drivers that are built


bash$ LD_LIBRARY_PATH="/tmp/mesa/lib" LIBGL_DRIVERS_PATH="/tmp/mesa/lib" glxgears


9. Verify that the screen has direct rendering enabled


[nareshv@fallenAngel tmp]$ LD_LIBRARY_PATH="/tmp/mesa/lib" LIBGL_DRIVERS_PATH="/tmp/mesa/lib" glxinfo 2>/dev/null | grep ^OpenGL
OpenGL vendor string: Tungsten Graphics, Inc. and nouveau
OpenGL renderer string: Gallium 0.1, NV46 on Nouveau/DRI
OpenGL version string: 1.5 Mesa 7.1
OpenGL extensions:


9. Screenshot with Gallium3d on my desktop ( I am getting from 900fps to 1200fps !, while the nouveau driver without this gallium gives only 250fps [same with nv driver])


10. I dont have any games to test the FPS, but you can try running openarena and see things working


NOTE: Remember, this gallium 3d is completely experimental and may not work with all the nvidia chipsets and might even crash your X when running heavy 3d applications. DONT REPORT ANY ISSUES WITH NOUVEAU TEAM WHEN USING GALLIUM